

Fig.1
[Photographing your artwork at night]
Over quite a few years of scrapbooking and sharing my art online, I've witnessed numerous discussions on the topic of obtaining quality photos of one's scrappy projects in less-than-ideal lighting situations.
A common convention of thought exists, that to photograph with quality, one must photograph outdoors in natural daylight.
I'm here to tell you, that it is possible to obtain a great photo of your project with no sunlight.
Some of you might not know this, but it is fact that at least (if not more) than 90% of my artwork in this gallery has been photographed at night utilizing this exact setup which I am sharing with you right now.
Of course, if you are able to photograph in day time, I urge you to do so since it's less complicated, and your camera settings will probably do a great job on 'Auto' mode.
Personally, I scrap and photograph at night because this is 'me' time away from family responsibilities. Also, a few years ago my camera and expensive lens had a near collision with concrete, as I learned that photography equipment and toddlers are not a good mix.
*Disclaimer: Please note that I am by no means a professional photographer. I know which lens, which setting to use, and how to position this home-made mini studio to get the image I want. It was learned by repetition and trial-and-error. I get the shot I want in 2-3 takes. This works for ME, but I encourage YOU to also experiment and perhaps even find a more efficient method. I am not very technically savvy hen it comes to photography.
*** *** *** ***
Šiuo įrašu siekiu pasidalinti mano namudine foto studija. Jau ne pirmą ir ne antrą kartą, esu girdėjus iš skrebinančių bendruomenės klaidingus įsitikinimus kad skrebuką nufotografuoti kobykiškai, yra būtina dienos saulė. Norėjau Jum pateikti argumentą kad saulė nebūtina (tik dienos šviesą simuliuojančias lemputes yra būtinos). Gal daug kam nežinomas faktas, bet apie 90 proc. (ar net daugiau) mano skrebintų darbelių šioj galerijoj, buvo fotografuoti būtent be dienos šviesos.
Aišku, jei turite galimybę fotografuoti dienos metu, tai žymiai geresnis variantas: Jūsų aparato 'Auto' rėžimas nenugrybaus, ir problemos su 'white balance' nepasireikš.
Aš fotografuoju naktimis kadangi tai vienintelis laikas kada galiu skirti sau ir savo rankdarbiams. Be to, prieš kelis metus rankose pagavau bei išgelbėjau krentantį veidrodinį aparatą su brangiu objektyvu - pamoka kad maži vaikai + foto aparatūra nesiderina.
Įspėju kad aš neesu prof fotografė; Čia išdėstau visa tai kas man suteikia galimybę nufotografuoti skrebuką su 2-3 kadrais max.
*** *** *** ***
To set up a home-made studio you will need:
- A white tri-fold, foam or corrugated cardboard display board (available at office supply or department stores).
- Scotch repositionable mounting squares.
- Two regular desk lamps (preferably both without the shade; My pharmacy lamp on the left, does not allow me to remove the dome shade).
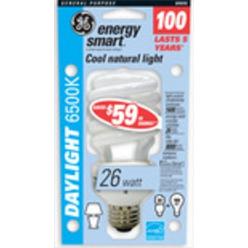
- Two 'Natural Daylight' bulbs (mine are from Target: GE Helical 26W 120 VAC 60Hz 400mA).
Įrengti šią namudinę foto studiją Jum reikės:
- Balto sulankstomo kartoninio ar plastikinio tripticho (JAV jie parduodami kancelerinėse, 'office' reikmenų parduotuvėse).
- Scotch laikinų lipnių pagalvėlių ant kurių laikinai prilipdysite skrebuką.
- Dvi stalo lempas...idealiai, tokias kurių gaubtas nusiėma (pavyz. kaip mano pavaizduota lempa dešinėj.
- Dvi 'Natūralios dienos šviesos' lempos: 'Natural Daylight'. Maniškės pirktos Target parduotuvėj, firma GE Helical 26W 120 VAC 60Hz 400mA. Čia ne spec. fotografų lempos...nžn kaip reikalai su jom LT, bet JAV jos skaitomos 'žalios ir kadangi dabar tendencija 'būti žaliam', visi jas vartoja namuose.
So here is my process:
Čia mano procesas:

Fig.2
Stick the Scotch removable foam squares where the edges of your page will go. Make sure they are not sticking out from behind your layout. I leave the sticky squares here permanently because I usually scrap only 12" x 12" format, so it's ready for the next photo shoot (Fig.2).
When I'm done with this display board, I adhere the backing paper back onto the sticky square, fold the display board, and place it back in my supply closet.
*** *** *** *** ***
Priklijuokite lipnias pagalvėles ties skrebuko kraštais, bet kad nekyšotų iš po skrebuko.
Pagalvėles tas pačias vartoju...baigiant skrebuko fotosesiją, atgal užklijuoju popieriukus ant lipnių pagavėlių, sulankstau triptichą ir padedu atgal į spintą.
Kadangi fotografuoju pagrinde tik 30cm x 30cm skrebukus, pagalvėlių atstumą man neaktualu keisti.

Fig.3
Scotch removable mounting squares hold up to one pound, and I've reused the same ones for...I lost count for how many layouts. Also, they do not tear, or harm the paper of your layout (Fig.3).
*** *** *** *** ***
'Scotch removable mounting squares' lipnios pagalvėlės teigia kad sugeba išlaikyti 1/2 kg svorį. Man jos tarnauja iki šiol, ir visai neplėšo skrebuko blogos pusės.

Fig.4
This is almost a bird's eye view of the set-up, which I photographed standing on a desk with a wide angle lens (Fig.4).
Note* I do not photograph the layout from such a high vantage point, nor with a wide angle lens (more on that later ;)...
This is not a high tech professional setup; I place the lamps on stacks of boxes, and a chair, so that the light orientation is toward the middle of the layout.
You'll need to experiment with placement of the lamps. Move them closer, more to the side, further away, at all times watching the lighting effect on the layout. Watch out for shadows, bright spots, and that dreaded glare (see photo below)...
*** *** *** ***
Fig.4 aiškiai matomas namudinės studijos išdėstymas, kurį nufotografavau užsilipusi ant stalo naudodama plataus kampo objektyvą.
Pastaba* Aš nefotografuoju skrebuko iš taip aukštai ir nenaudoju plataus kampo objektyvo (apie tai skaitykite toliau).
Tai nėra profesionalus išdėstymas – aš pastačiau lempas ant knygų krūvos ir ant fotelio nukreipdama šviesą į skrebuko centrą.
Jūs turėsite eksperimentuoti su lempų išdėstymu. Priartinkite jas, patraukite į šalį, atitolinkite, kiekvienu atveju stebėdami skrebuko apšvietimą. Stebėkite šešėlius, šviesos dėmes ir blizgesį (žiūrėkite nuotrauką žemiau).
*** *** *** ***

GE Helical 26W 120 VAC 60Hz 400mA
*** *** *** ***
Elektros lemputė: Fig 6 viršuje ir Fig 7 dešinėje
GE Helical 26W 120 VAC 60Hz 400mA

Fig.5
Glare from the lamps will ruin the quality of your image (Fig.5).
Take time to really look as you are positioning your lamps, that no glare is visible. My experience tells me that placing both lamps at about 45 degree angle to the layout will eliminate glare. Check again as you are composing your image through the viewfinder. At times, when I move my camera slightly at an angle, I notice glare.
Again, really look before and during the composition of the shot! It is a big waste of time, and quite an irritation, to think you have got the shot, only to find out later upon uploading the photos, that everyone of them is with glare.
*Another reason for glare is use of on-camera flash. So, disable your camera's flash! (more on that later...)
*** *** *** ***
Lempų sukeltas blizgesys sugadins nuotraukos kokybę (Fig 5). Sustatydami lempas stebėkite, kad blizgesio nebūtų matyti. Iš savo patirties galiu pasakyti, kad blizgesiu neliks, jei lempas sustatysite 45 laipsniu kampu. Fokusuodami vaizdą dar kartą įsitikinkite, kad nėra blizgesio. Kartais nukreipdama fotoaparatą šiek tiek į šalį aš pastebiu blizgesį.
Vėlgi, gerai apžiūrėkite kompoziciją prieš ir fotografavimo metu. Jūs tik iššvaistysite veltui laiką, jei manysite, kad pavyko nufotografuoti, ir tik vėliau, perkeldami nuotraukas į kompiuterį, pastebėsite blizgesį.
Kita blizgėjimo priežastis yra įjungta fotoaparato blykstė. Taigi, išjunkite ją (apie tai vėliau).
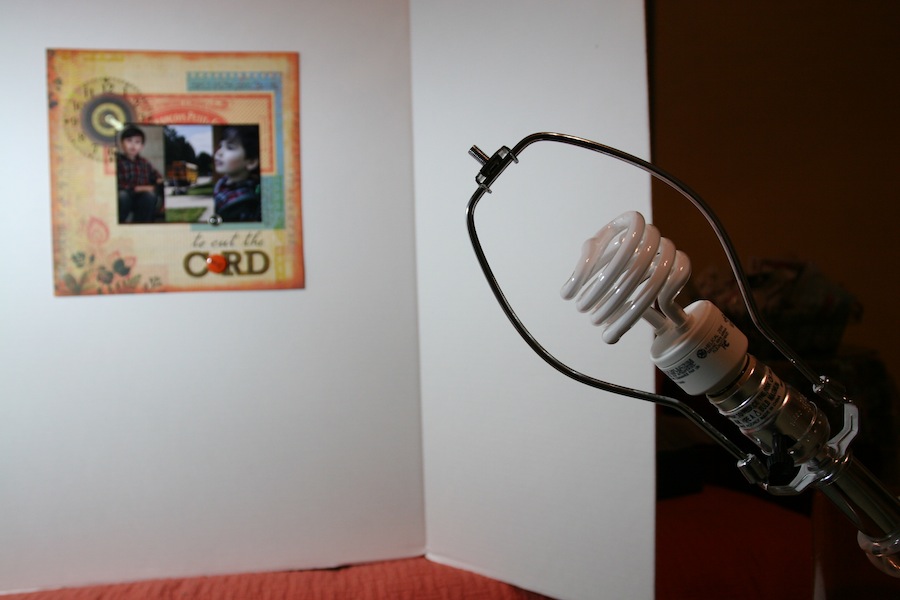
Fig.6
Bulb: (Fig.6 above, and Fig.7 to the right)GE Helical 26W 120 VAC 60Hz 400mA
*** *** *** ***
Elektros lemputė: Fig 6 viršuje ir Fig 7 dešinėje
GE Helical 26W 120 VAC 60Hz 400mA
*** *** *** ***
*off-topic, but so useful: Another great tip that I've read in a photography book, is that the screw-on post tip of the lampshade where the finial screws on (see Fig.6), will serve as an impromptu tripod, for any model camera (of course you would not want to try this with your super heavy 10 lb. camera with accessory lens, but any point and shoot - not too heavy camera would work).
Try this tip the next time your family gathers and you want to be part of a group shot.
*** *** *** ***
*ne į temą, bet naudinga: dar vienas patarimas apie kurį perskaičiau fotografijos knygoje – lempos stovas gali tarnauti kaip improvizacinis stovas bet kokio modelio fotoaparatui (be abejo, jūs nenorėsite to daryti su savo ypač daug sveriančiu fotoaparatu su pridedamu objektyvu, bet su paprastu, nedaug sveriančiu fotoaparatu jums pavyks). Išbandykite šį patarimą kitą kartą, kai susirinks visa jūsų šeima ir jūs norėsite taip pat pakliūti į kadrą.
*** *** *** ***
So why do these natural daylight bulbs make such a difference when photographing indoors???
It is because they simulate pure white light. I bet you are familiar with typical indoor photos taken on auto setting resulting in that yellow tint. The yellow color cast is due to regular light bulbs, also known as incandescent light bulbs, which give off warm, yellow light (see Fig.8 below for comparison). Therefore, using the daylight bulbs, your scrapping creation will maintain true-to-life colors, and make the post-processing in photo editing program unnecessary, or at least minimal.
*** *** *** ***
Tai kodėl šios dienos šviesos elektros lemputės tokios svarbios fotografuojant viduje? Todėl, kad jos atspindi gryną baltą šviesą. Lažinuosi, kad jūs žinote apie tas tipiškas patalpoje darytas nuotraukas darytas naudojantis auto režimo nustatymu, kuomet nuotraukose gaunamas tas geltonas atspalvis. Geltona šviesa yra metama įprastinių elektros lempučių, kurios dar vadinamos baltai įkaitintomis elektros lemputėmis, kurios meta šiltą gelsvą spalvą (palyginimui žiūrėkite fig 8). Be to, naudodami dienos šviesos elektros lemputes, jūs išlaikysite tikrąsias savo skrebuko spalvas, jums nereikės jo redaguoti arba redagavimas bus minimalus.

Dabar pereikime prie techninių fotografavimo aspektų:

Nuotraukos kompozicija: aš atsiklaupiu ant kelių laikydama fotoaparatą tiesiai prieš skrebuką ir lygiagrečiai jam (Fig 10).
*** *** *** ***
Tai yra ką tik nufotografuotas vaizdas (Fig 11). Atkreipkite dėmesį, kad fotografuodama aš palikau šiek tiek vietos aplink skrebuko kraštus. Tai yra svarbu apkarpant, ypač horizontalią liniją, jei ji nėra tiesi.
Įsitikinkite, ar viskas sufokusuota, nėra blizgesio, tačiau aš dar nebaigiau su savo skrebuku. Nuotraukoje yra šioks toks pilkumas (ypač jį išryškina baltas rėmelis), taigi tai rekia ištaisyti, kad skrebukas nuotraukoje atrodytų toks, koks yra tikrovėje.
Štai kaip aš redaguoju nuotraukas:
Gero jums fotografavimo,
Irma
*off-topic, but so useful: Another great tip that I've read in a photography book, is that the screw-on post tip of the lampshade where the finial screws on (see Fig.6), will serve as an impromptu tripod, for any model camera (of course you would not want to try this with your super heavy 10 lb. camera with accessory lens, but any point and shoot - not too heavy camera would work).
Try this tip the next time your family gathers and you want to be part of a group shot.
*** *** *** ***
*ne į temą, bet naudinga: dar vienas patarimas apie kurį perskaičiau fotografijos knygoje – lempos stovas gali tarnauti kaip improvizacinis stovas bet kokio modelio fotoaparatui (be abejo, jūs nenorėsite to daryti su savo ypač daug sveriančiu fotoaparatu su pridedamu objektyvu, bet su paprastu, nedaug sveriančiu fotoaparatu jums pavyks). Išbandykite šį patarimą kitą kartą, kai susirinks visa jūsų šeima ir jūs norėsite taip pat pakliūti į kadrą.
*** *** *** ***
So why do these natural daylight bulbs make such a difference when photographing indoors???
It is because they simulate pure white light. I bet you are familiar with typical indoor photos taken on auto setting resulting in that yellow tint. The yellow color cast is due to regular light bulbs, also known as incandescent light bulbs, which give off warm, yellow light (see Fig.8 below for comparison). Therefore, using the daylight bulbs, your scrapping creation will maintain true-to-life colors, and make the post-processing in photo editing program unnecessary, or at least minimal.
*** *** *** ***
Tai kodėl šios dienos šviesos elektros lemputės tokios svarbios fotografuojant viduje? Todėl, kad jos atspindi gryną baltą šviesą. Lažinuosi, kad jūs žinote apie tas tipiškas patalpoje darytas nuotraukas darytas naudojantis auto režimo nustatymu, kuomet nuotraukose gaunamas tas geltonas atspalvis. Geltona šviesa yra metama įprastinių elektros lempučių, kurios dar vadinamos baltai įkaitintomis elektros lemputėmis, kurios meta šiltą gelsvą spalvą (palyginimui žiūrėkite fig 8). Be to, naudodami dienos šviesos elektros lemputes, jūs išlaikysite tikrąsias savo skrebuko spalvas, jums nereikės jo redaguoti arba redagavimas bus minimalus.

Fig.8
Next, let's get to the more technical aspects of how I photgraph my layouts:- I use a Canon 50mm f1.4 prime lens, which as many of you know, is a very light sensitive lens, and performs well in indoor settings. But really any camera will do!
- I set my dial on the landscape mode - the mountain icon on your camera (see Fig.9 below).
Dabar pereikime prie techninių fotografavimo aspektų:
- Aš naudoju Canon 50mm f1.4 objektyvą, kurio lęšiai, kaip žinote yra labai jautrūs šviesai ir puikiai tinka fotografuoti patalpoje. Bet puikiai tinka bet koks fotoaparatas.
- Aš pasirenku peizažo režimą – kalnų ikona jūsų fotoaparate (žiūrėkite Fig 9).
Fig.9
- NOTE: I have an external Speedlite flash unit mounted on my dSLR camera. I keep that flash OFF, so when I set the mode to 'landscape'(Fig.9) it blocks the pop-up flash. If you do not have an external flash mounted on the hot shoe of the camera, setting the camera dial on the landscape mode will automatically trigger your camera's pop-up flash. You MUST turn off your flash, or try blocking/obscuring it, but just do not aim it straight at your layout, because you WILL get that dreaded glare, and overall poor quality.
- Why do I set my dial to 'landscape'? Because you are photographing everything on one plane, and doing so will guarantee that everything on your page is in sharp focus. Alternately, you may shoot in Aperture priority mode (Av) around f 5.6, 8, or 11. But, the larger the f value, the more light you will need, and then you have to increase your ISO 400, 800, etc. However, the higher the ISO value the more grain or pixelation your image will have (which is undesirable if your goal is to have a sharp photo). You can also shoot in a semi-automatic Priority mode =P; That way your flash will be disabled. I urge you to experiment, and take notes on what works for you. That way, next time you shoot, you'll get the shot in 1-2 takes.
*** *** *** ***
- PASTABA. Aš turiu papildomą išorinę blykstę tvirtinamą prie mano veidrodinio fotoaparato, tačiau laikau ją išjungtą, nes fotografuojant peizažo režimu ji blokuoja atsirandančią blykstę. Jei neturite papildomos blykstės, nustačius peizažo režimą jūs automatiškai nustatysite ir blykstę. Turėtumėte išjungti savo blykstę ar blokuoti ją, nes nuotraukoje gausite tą blizgesį ar netgi prastos kokybės nuotrauką.
- Kodėl aš nustatau peizažo režimą? Nes jūs fotografuojate viską vienoje plokštumoje, naudojantis šiuo režimu jūs būsite garantuotas, kad vaizdas bus griežtai sufokusuotas. Kitas būdas, jūs galite fotografuoti aperture režimu, nustatydami f 5.6, 8 ar 11. Kuo didesnė f reikšmė, tuo daugiau šviesos reikės, todėl turėsite padidinti ISO iki 400, 800 ir t.t. Tačiau kuo didesnė ISO vertė, tuo jūsų nuotrauka bus labiau grūdėta (kas yra nepageidautina, jei tikslas yra nufotografuoti gerai sufokusuotą vaizdą). Jūs taip pat galite fotografuoti pusiau automatiniu Priority = P režimu. Tokiu būdu blykstė bus išjungta. Siūlyčiau eksperimentuoti ir užsirašinėti, kas jums tinka. Tokiu būdu, kitą kartą fotografuojant, padaryti gerą kadrą jums pavyks iš 1-2 karto.

Fig.10
Composing the shot: I kneel down on the floor holding my camera, so that it is directly parallel and in front of the layout (Fig.10)
*** *** *** ***Nuotraukos kompozicija: aš atsiklaupiu ant kelių laikydama fotoaparatą tiesiai prieš skrebuką ir lygiagrečiai jam (Fig 10).
*** *** *** ***
*You must be at 'eye-level' with the layout, that is, the lens must be aiming for the center of the layout. If you are shooting down, or up to the layout, the edges of the layout will be distorted.
If you place the display board o the table, you may not have to kneel, but in my case, placing it on my desk would require extension cord cables for the lamps, and that's just another additional step to complicate the process.
Obviously, composing the shot I make sure that no part of the lamp is showing in the shot (and hey! Did I remind you to constantly be checking for glare as you are adjusting your body positioning with camera? ;)
*** *** *** ***
*Jūs turite išlaikyti akių lygį, t.y. Fotoaparatas turi būti skrebuko centro lygyje. Jei fotografuosite nukreipę fotoaparatą aukštyn ar žemyn, skrebuko kampai bus iškraipyti. Jeigu popierių, prie kurio tvirtinate skrebuką uždėtumėte ant stalo, jums nereikėtų klauptis, bet mano atveju tada reikėtų papildomų laidų lempoms sujungti ir tai tebūtų papildomas būdas apsisunkinti procesą.
Aišku, fotografuodama aš įsitikinu, kad nuotraukoje nesimato nė vienos lempos kampo (ir taip pat svarbu žiūrėti, kad nesimatytų blizgesio kadre).
Aišku, fotografuodama aš įsitikinu, kad nuotraukoje nesimato nė vienos lempos kampo (ir taip pat svarbu žiūrėti, kad nesimatytų blizgesio kadre).

Fig.11
Here is the straight-out-of-camera shot (Fig.11). Notice that I left some room at the top and bottom of the page; This is important when you crop, especially if the horizon is not straight and your page needs to be straightened.
Looks like everything is in focus, there's no glare, however I'm not done yet. There is a bit of a bue/grey cast to the photo (especially the white display board reveals this), so that must be corrected to make the layout look like the image I see in real life.
*** *** *** ***
Tai yra ką tik nufotografuotas vaizdas (Fig 11). Atkreipkite dėmesį, kad fotografuodama aš palikau šiek tiek vietos aplink skrebuko kraštus. Tai yra svarbu apkarpant, ypač horizontalią liniją, jei ji nėra tiesi.
Įsitikinkite, ar viskas sufokusuota, nėra blizgesio, tačiau aš dar nebaigiau su savo skrebuku. Nuotraukoje yra šioks toks pilkumas (ypač jį išryškina baltas rėmelis), taigi tai rekia ištaisyti, kad skrebukas nuotraukoje atrodytų toks, koks yra tikrovėje.
*** *** *** ***
This is how I edit my photos:
- The photo is opened in iPhoto (comes with Mac). You may also use other software such as free Google's Picasa, or Photoshop.
- I almost always adjust the exposure and shadows; Sometimes I'll slightly adjust saturation and sharpness. The main one to tweak is definitely the exposure.
- Next, I crop (custom setting), getting rid of all that white display board.
- Final step is to resize your layout. I resize my layouts to maximum 900 pixels wide, as this is the optimal size for web viewing. Unresized photos are usually around 3889 pixels - way too huge to be viewed online(!) You may even resize your photos on your computer's desktop if you go to Tools ---> Adjust Size.
Štai kaip aš redaguoju nuotraukas:
- Nuotrauką atsidarau iPhoto programoje (būna Mac). Jūs galite naudotis nemokama Google Picasa programa ar Photoshopu.
- Aš beveik visada pataisau išlaikymą ir šešėlius. Kartais nežymiai pakoreguoju prisotinimą ir ryškumą. Tačiau pats svarbiausias yra išlaikymas.
- Paskui aš apkarpau nuotrauką, panaikindama visą baltą rėmelį.
- Galutinis žingsnis yra sumažinti nuotrauką. Aš sumažinu savąją palikdama 900 pikselių pločio, nes tai yra optimalus dydis talpinant skrebuką į internetą. Nesumažintos nuotraukos yra apie 3889 pikselių, o tai yra ryškiai per daug talpinant į internetą. Jūs galite sumažinti nuotraukas ir kompiuterio desktope, tam reikia eiti į Tools --> Adjust Size.

Fig.12
This is the final image after editing (Fig.12). It looks like the layout I see in front of me, so I'm happy with the results.
*** *** *** ***
Tai yra galutinė skrebuko nuotrauka po redagavimo (Fig 12). Ji atrodo būtent taip, kaip preiš mane gulintis skrebukas, taigi aš esu patenkinta rezultatu.
*** *** *** ***
Thank you all for your interest in my tutorial! My wish is that you found something useful, or new to you. I hope you leave me a comment and share how you photograph your work. Maybe it'll help me to simplify my process even more!*** *** *** ***
Ačiū visiems, kurie susidomėjo mano pamoka. Tikiuosi, kad atradote ką nors nauja ar naudinga. Tikiuosi, paliksite komentarą apie tai, kaip jūs fotografuojate savo skrebukus. Galbūt tai netgi supaprastins mano procesą.
Happy photographing to you,
Irma
*** *** *** ***
Gero jums fotografavimo,
Irma
(P.S. Nuoširdžiai dėkoju Astai už vertimą...AČIŪ!!!!)
29 comments:
P.S. an apology for my lithuanian friends for not finishing the translation ;)
Kreipiuosi pas savo mielas skrebukes ;)
Keletą iš Jūsų anksčiau man minėjo kad jei kada reikės pagalbos dėl vertimo į lietuvių k., kad kreiptis pagalbos. Tai va..kreipiuosi ;)
Rašydama straipsnį, pradžioj verčiau, bet...užsiknisau :( Nežinau ar man trūksta motyvacijos ar jėgų (ar abiejų), bet išgaravo noras prie šio straipsnio sėdėti papildomai dar parą ar dvi. Tad jei kas nepatingės man pagelbėti, žinau kad aš ir kiti šio tinklaraščio lankytojai bus labai dėkingi.
Ačiū!
Irma
Wonderful tutorial! - Thank You Irma for sharing this process with us
This is a great tutorial! Thank you for sharing all your tips! Now, I have a question for you: when you photograph your LOs with daylight do you also use the landscape setting (for the same reasons you mentioned)?
Thanks Trudi and Nathalie ;)
Yes! Nathalie, I also use the landscape mode when shooting layouts outdoors, because it makes everything in sharp focus.
Oh that is awesome! Irma this is fantastic..so precise and clear! Thank you..I have bookmarked this page as I am certain i will visit it very soon..
What a great idea! Thanks so much for this step by step tutorial. I think it's definitely going to be worth a try, especially since it's not always possible to wait until daytime to photograph a layout.,especially if you would like to submit it for a deadline.
thanks for this, even if it's a little bit too complicated for me in english. I'll read this again later.
Catherine
Dekui Irma, labai geras straipsnis!! Tikrai yra ko pasimokyti. As fotografuoju panasiai, skirtumas tik tas, kad lapa dedu ant zemes ir fotografuoju is virsasus, net nepagalvojau, kad galima darbeli pritvirtint taip kaip darai tu, tikrai super ideja, reiks ismegint. Apsvietimui as naudoju blykste, kuria pasidedu aukstai ir nukreipiu tiesiai i darbeli. Toliau tvarkau su Photoshop'u ir tvarkau butent tai ka ir minejai: islaikyma, seselius, tuomet iskerpu darbeli, kartais dar primokinta MB padarau ir feather efekta krastams (kai fotografuoju ant juodo lapo).
Labai patiko man kad parasei kokio dydzio galutine nuotrauka palieki, nes man cia buna klausimas ir supratau, kad palieku gerokai per didele, dabar jau zinosiu :)
Dar karta dekui uz toki issamu straipsni!!!
Superinis tutorialas! labai knieti ismeginti, tik kazin, ar pas mus lengva gauti tokio didelio formato ir dar baltos spalvos kartono...
Galeciau padeti isversti, tik deja, nepavyktu anksciau nei savaitgali :(
sooo informative thanks so much for sharing this technique .... I will follow your instructions and experiment and learn what works best ..thanks again Irma...hugz x
Thanks Irma - I found this very interesting. I just have one question & that is that it looks like your main lights are off & only the lamps are on - in other words the rest of your room is dark. Is this correct? Would you mind answering this here in your comments section & I will come back & check up in a few days to see if there is an answer here. thank you! I photograph at night too. I don't think mine is as successful as my daylight shots, but daylight bulbs are not readily available here in South Africa, although I may be able to find them in specialist lighting shops & am certainly going to take a look. I work in an allwhite studio & close the white door to act as a natural light reflector. I shine my desk lamp onto the door so that I am using reflected "bounced-off" lighT & I have an overhead light consisting of 3 spotlights, but I think I would do well to get a folding screen system like yours going - although I would have to make it - have never seen anything like that here. I attach mine to my built in cupboards that are pure white melamine - using bluetack/prestik on the back - but like your idea of the mounting squares so will try that too! I put my light setting on SUNLIGHT & I find that that is a good trick to lessen the yellow glare from the lights considerably. Then I tweak in the editing process too. thanks for taking the time to fill us all in on your process - definitely picked up a trick or two :)
Fantastic! Thank you for the detailed instructions!
Thanks all for the feedback and comments!
*** *** ***
Ačiū už komentarus ;)
*** *** ***
Helen: I usually leave the fan lights on (mine are similar to Fig.8); They are weak, and are not the main source of illumination. Hmmm...I'm trying to remember if the reason it is so dark in the room because the camera's meter exposed for the light bulbs which were in front of the camera, or because I didn't turn on the overhead fan lights(?)
I usually DO have them on though, but they don't give much to overall exposure.
(Fig,8) is shot with the Speedlight 420EX flash ON and bounced from the ceiling...it lit up the whole room. I did that to show the setup, and the overall room area where I shoot, but I usually DO NOT have the flash on when photographing the LO.
I think it's a wonderful suggestion to all the readers what you wrote about bouncing the light off a white wall, reflector, or another white poster board/sheet of paper. That is the precise point I was trying to get across - is that if you do use flash, make sure it is not aiming directly to the layout because it will definitely cause glare.
When shooting indoors (especially portraits) with my swivel Speedlite, I also bounce the light off white posterboard, ceilings, etc...it illuminates great without giving people that white "deer caught in the headlights" look.
However, I learned to be careful about bouncing light of my colorful walls (we have red, yellow and green walls). For example, one Holiday photo shoot, I had the kids sit by the tree and bounced light off the red wall, which resulted in a red/pink color cast in the photos. Just be aware if you are bouncing light off a color surface, that color cast will be reflected in your pictures.
Anyways, I'm getting off topic, but photography is so enjoyable to me...always on the chase for that illusive 'perfect' shot. I enjoy discussing it, and reading about it.
Thanks to Asta, the complete translation of this article was made possible ;)
*** *** *** ***
Ačiū Astai kad pabaigė mano pradėtą vertimą!
Ačiū už milžinišką darbą ir nesavanaudišką norą dalintis patirtimi ...
Visuomet mąsčiau, kad lengviau palaukti ryto ir bandyti fotografuoti dienos šviesoje. Todėl, nemėgstu savo fotografuotų darbų, nes matau juose savo darbo broką.
Reikės tavo patirtį pritaikyti ir bandyti dar kartą ... tikiuosi patiks :)
Labai super, kad pasidalinai savaja patirtim :) dabar vakarojant prie darbeliu bus zymei lengviau ir geriau iamzinti. as vis niekaip niekur neradau info kokias lempas geriausia tokiam fotografavimui naudoti ir kokiais nustatymais vadovautis, tad dabar lyg akyse prasvesejo :) saunuole tu ;)
This is a great tutorial! Thank you for sharing all your tips!
Hugs
Aciu us sugaista laika ir labai labai naudinga informacija. :)
O jei as noriu nusistatyt peizazo rezima, taciau pas mane nera tos kalnu ikoneles? Pas mane yra: AUTO; P ; Tv ; Av ; M ; C1 ; C2 ; SCN.
Ignai speju kad 'SCN' tavo fotike yra 'Scene' tai ten manau galetum peizazo rezima pasirinkti jei neklystu (?)
Jei ne tada bandyk ivairius rezimus:
Av ant f5.6, 8, ar f11 (bet tada reikes ISO kelti).
P=Program rezimas tai semi-auto....neijungia blykstes. Tiktu ir tai, bet tada reikia "WB=Baltos spalvos rezima nustatyti kad numustu ta geltonuma...ant lemputes ikono nustatau WB tada.
Bandyk ir ant Auto...geriausias budas ismokti tai visais rezimais isbandyti ir stebeti rezultatus. Tad sekanti karta fotografuojant tiksliai zinosi kaip ka nustatyti kad gauti pageidaujama rezultata.
TFS Irma!!! :D
Irma...fabulous tips thank you so much!....
Hi Irma,
This is a great tutorial! Thank you for sharing with us.
thanks a lot for your comment in my blog today :)
xx
Fabulous Post Irma!! And thanks so much for sharing!!!! So easy to understand!!
Hugs
Lou xx
This is EXCELLENT! I am a night scrapper, too, and I usually photograph in the daylight. But there are times when i wish I had a set up like this! I think I might give it a go! THANK YOU!
awesome tutorial. Thank u so much for sharing. i scrap at night too...like u! LOL
Fantastic tutorial! Thank so much for share this!
So very helpful! Thanks a ton for sharing this info. Going to set up my "layout studio" like this very soon!!! Thanks again!
Irma thanks a lot for all the useful tips!!
Thanks for including ALL of the steps for this! I appreciate the tutorial.
Post a Comment